
Take Life One Cup At A Time
take the quiz! It only takes a minute - promise! >
Hey girl! What's Your Signature Latte? Whether it's a frothy latte or a cold brew, your personality shines through. Find out what your java ingredients are!

shop my instagram
LIKEtoKNOW.it


Copyrighting Your Images

This week’s Photo Tip Thursday is all about copyrighting your images. Lately Grace and I have been noticing that a lot of her photos have been used by other individuals without her permission on their personal blogs, as well as other social media platforms. In some instances, these photos were used in an attempt to garner profit. This is particularly frustrating for bloggers becuase they spend a lot of time curating content for their readers, and at the very least, they want to make sure that anyone who’s viewing this aforementioned content will be able to know where it originated from. This also applies to anyone taking photos too for personal or commercial use as well. You don’t want someone else taking the credit for photos that you worked hard to create!
There’s a pretty cool way to protect yourself against unwanted use/reproduction of your images. It involves attaching what’s known as metadata to your images. Metadata contains information as to the content’s creator, their email address, website URL and much, much more. Now, this information is not visibly stamped on your image like a watermark, rather it is data that is tagged digitally {and discretely} to each photo you export, and it’s transferred with the image no matter where it’s uploaded, pinned, posted, etc. This is awesome because if you ever see one of your images uploaded to another site without your permission, you can report it and have definitive proof that the image belongs to you.
1. I’ll go over how to do this in Adobe Lightroom. If you don’t have this program, then you should definitely get it. It makes attaching metadata to your photos an absolute breeze. Open up Lightroom and in the ‘Library’ module, click on an image. On the right side of the screen, twirl down the ‘Metadata’ tab by clicking on the arrow.
2. Click on the ‘Preset’ drop-down menu and then click ‘Edit Presets…’. This will bring up a new window.
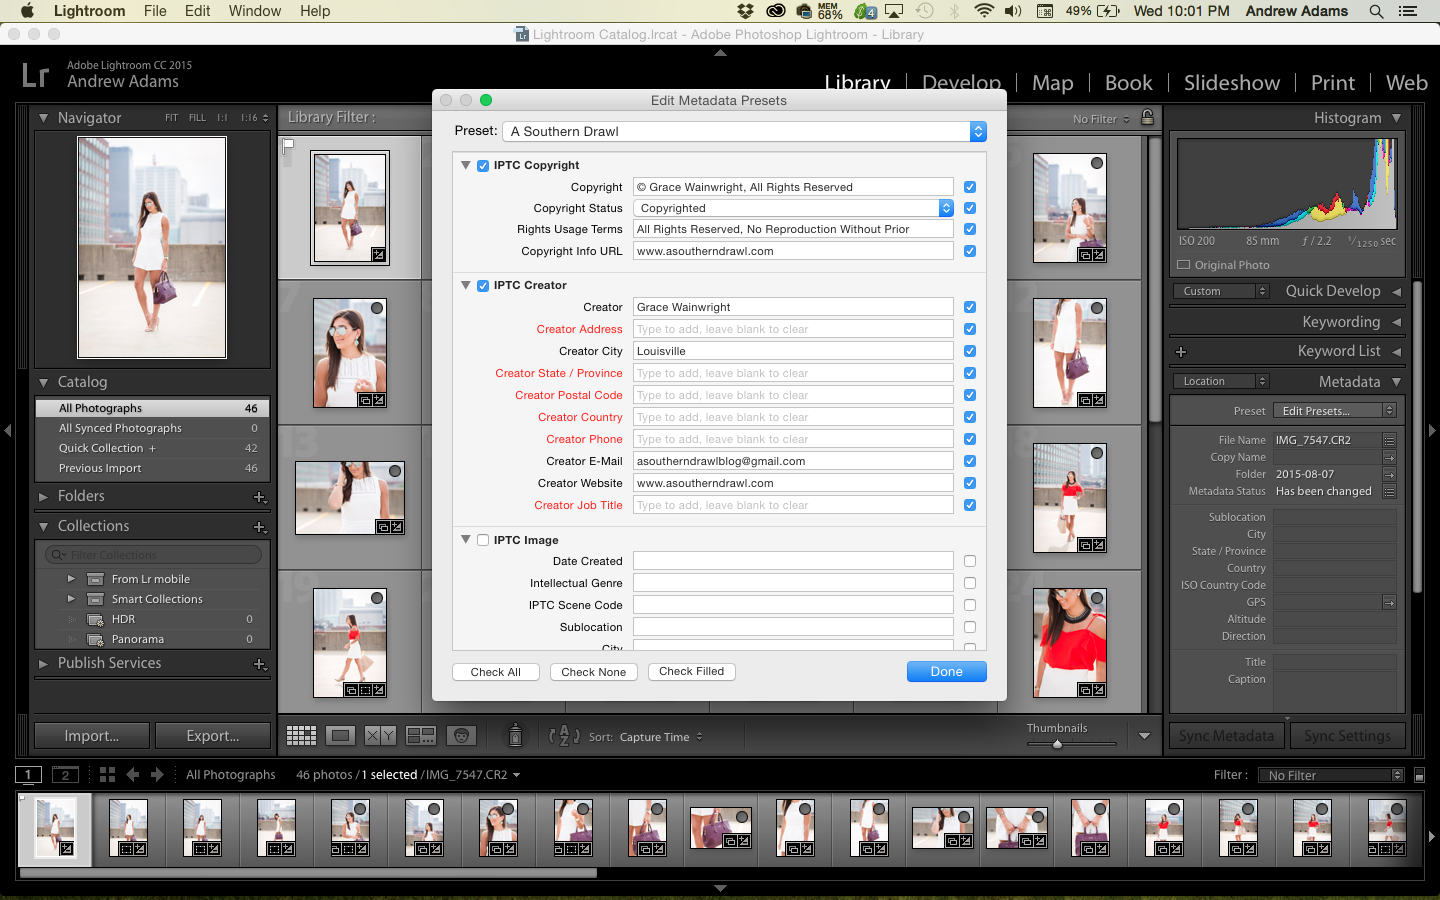
3. Under the ‘ITPC Copyright’ Section, enter this information:
Copyright: hit OPT + G (Mac)/ALT + G (Windows) to make the copyright symbol, then enter your name
Copyright Status: Copyrighted
Rights Usage Terms: All Rights Reserved, No Reproduction Without Prior Permission
Copyright Info URL: enter the URL to your blog/website here
4. Under the ‘ITPC Creator’ section, enter this information:
Creator: enter your name here
Creator City: enter your city here
Creator E-Mail: enter your email address here
Creator Website: enter the URL to your blog/website here
5. Under the ‘ITPC Status’ tab, enter this information:
Credit Line: enter your name followed by the URL to your blog/website
Source: enter your name here
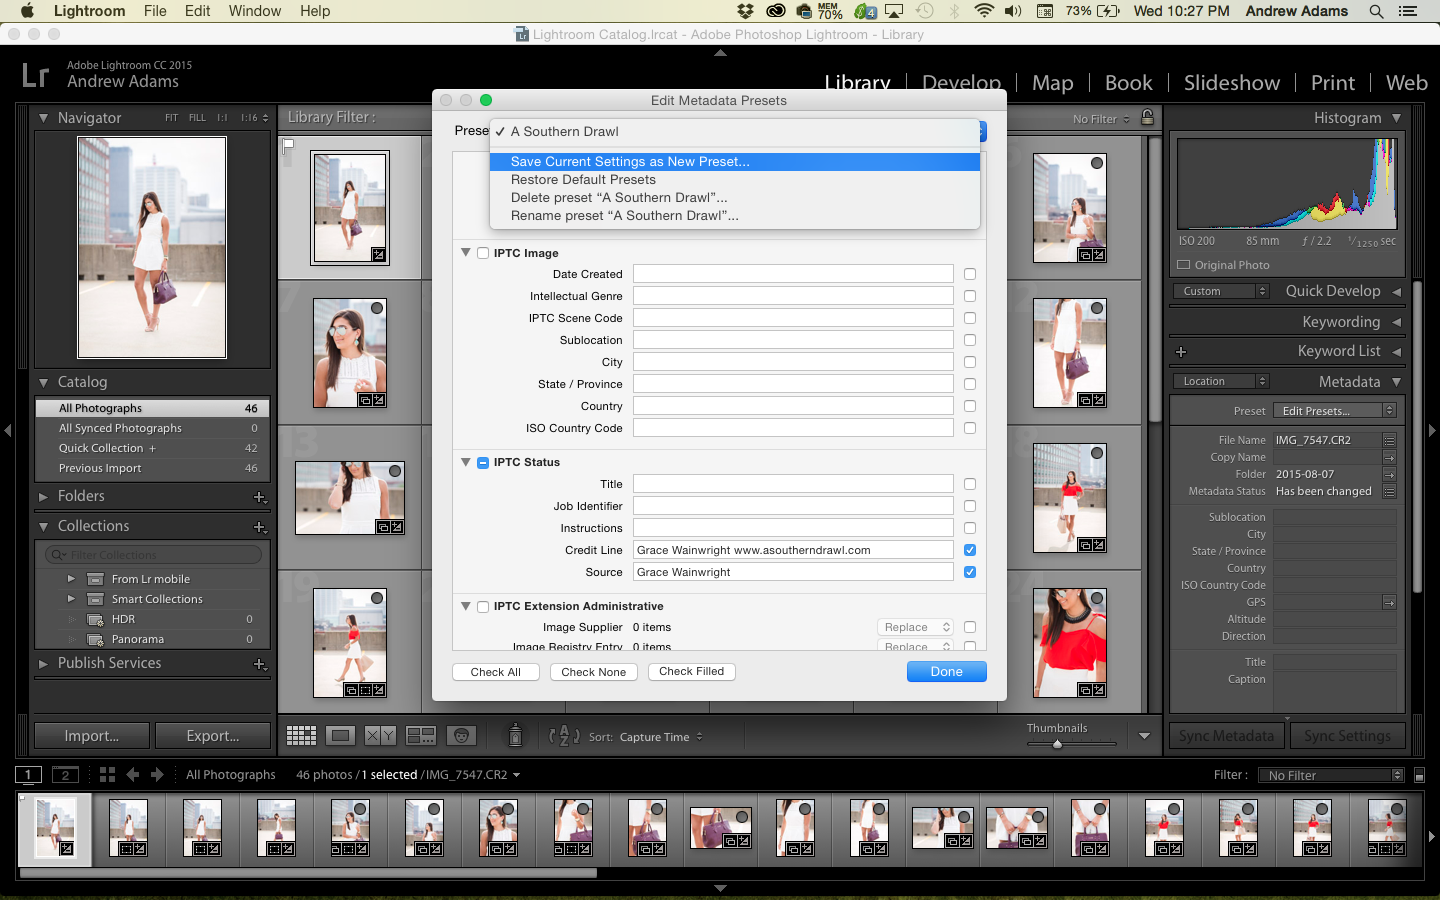
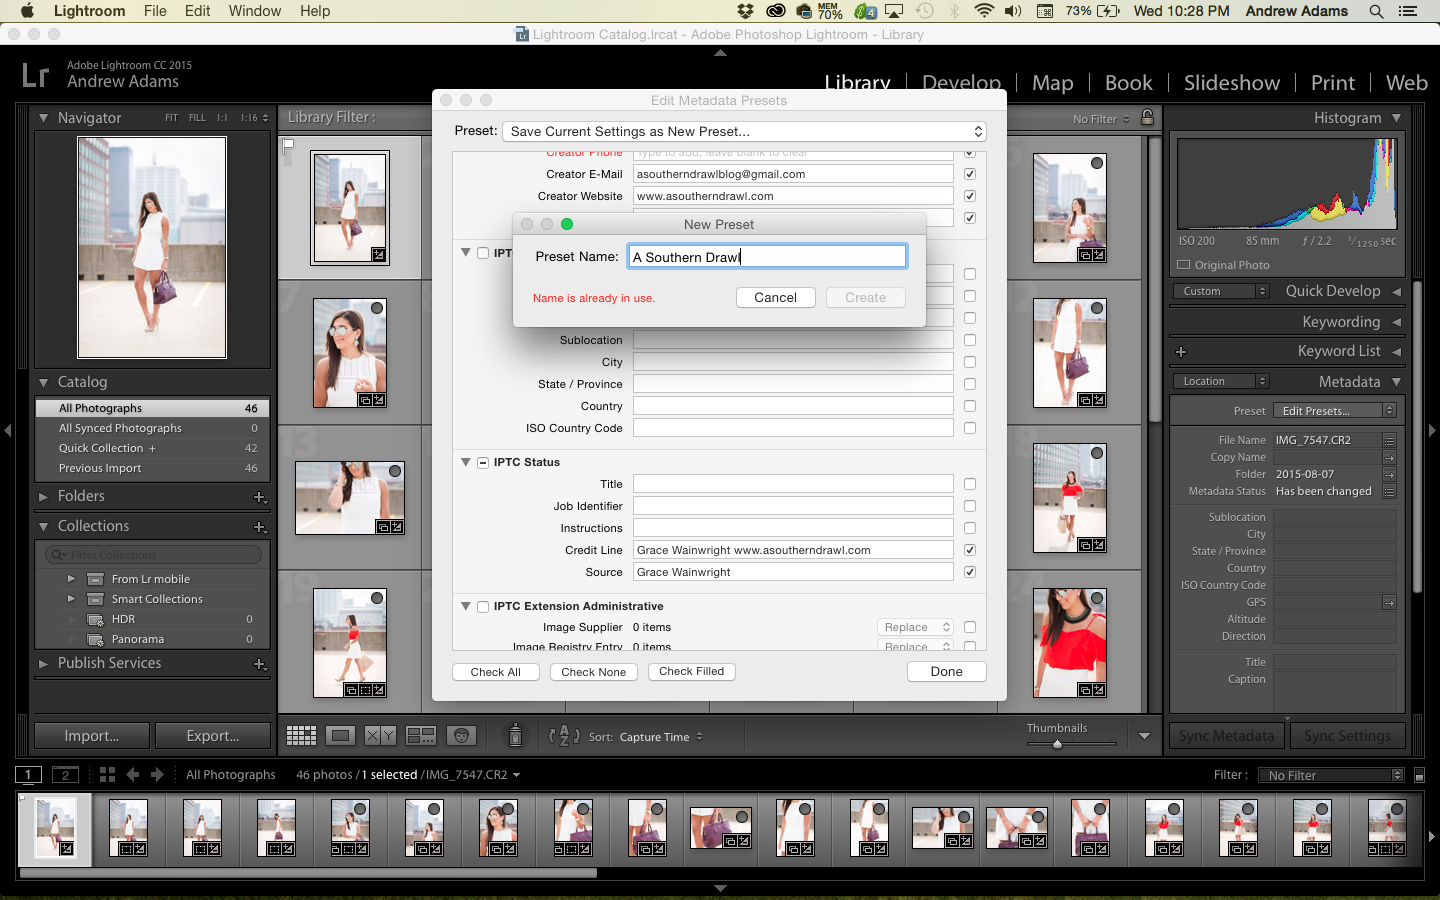
6. After you’ve entered all of your information, click on the ‘Preset’ drop-down menu at the top of the window and then select ‘Save Current Settings as New Preset…’. You can name it whatever you like.
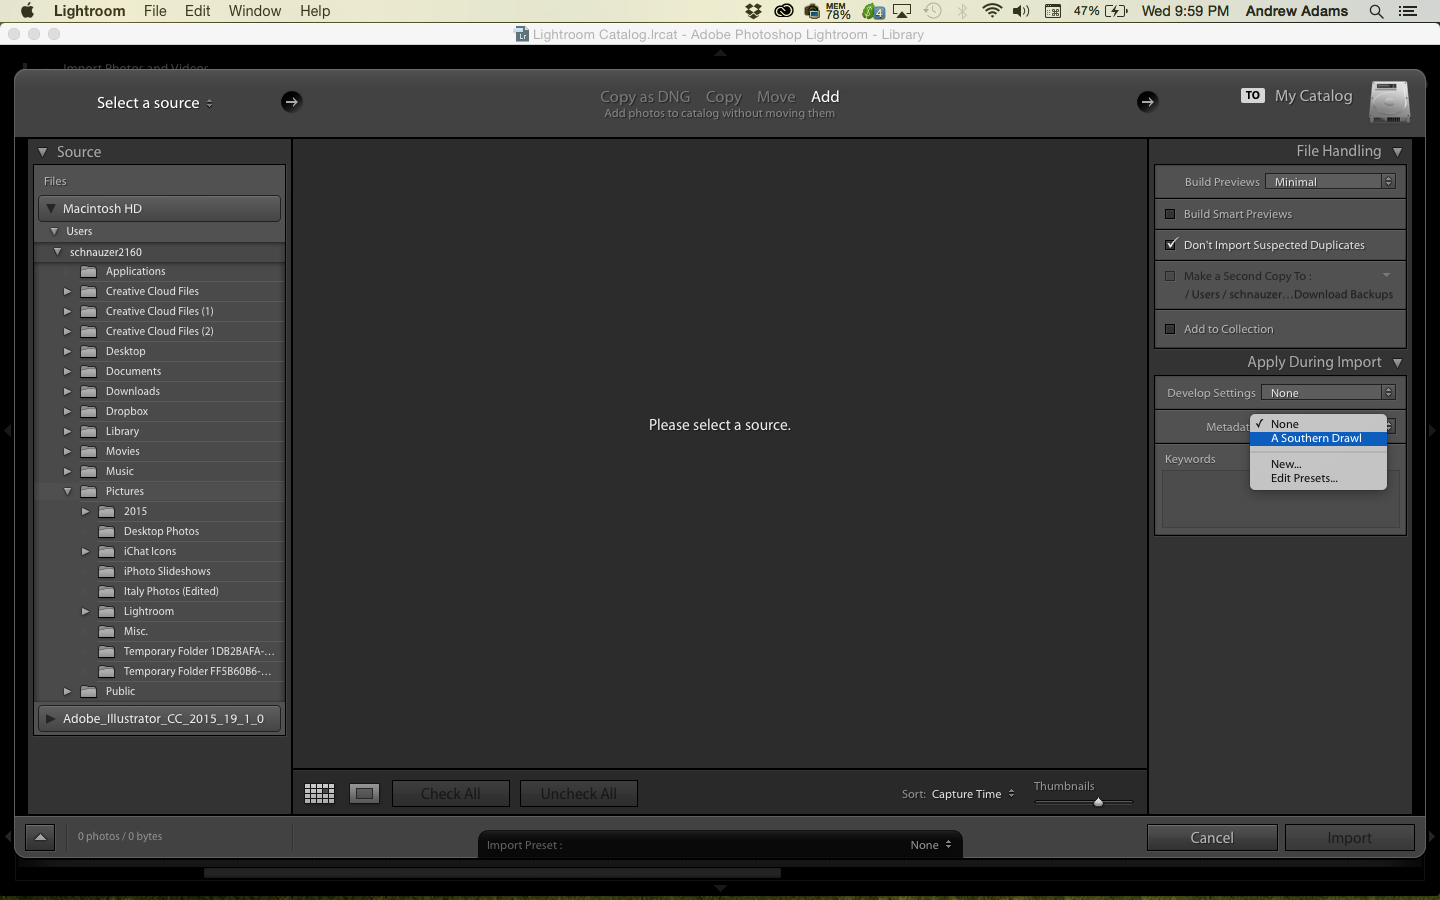
7. Now, when you’re importing/exporting photos into/out of Lightroom, you can simply select the metadata preset you made from the ‘Metadata’ drop-down menu under the ‘Apply During Import/Export’ tab, and this will attach the metadata to all of your photos!
I hope you all enjoyed this post. Also, should you have any questions or suggestions for topics that you’d like me to cover in future posts, either shoot an email to asoutherndrawlblog@gmail.com or leave them in the comments below.
Thanks for reading!
Andrew
Leave a Reply


Become a healthier version of yourself by joining the FITwithASD community today! For only $8.99/month or $89/year, you never have to worry about workouts, macros, or a meal plan again.
learn more about fitwithasd ⟶


shop my instagram
LIKEtoKNOW.it
The All-Time Favorite Posts

read this post
⟶
Personal
10/27/18 Mr. & Mrs. White
There’s not a day that goes by when I don’t feel so blessed to be Jordan’s wife. He is my everything. These photos and video are the sweetest reminder of our love for one another. So, grab a cup of coffee, pull up a seat, and try not to bawl your eyes out (because I know we did). Every time we look through our photos and watch our video, we cry the happiest tears.


read this post
⟶
Personal
The Proposal
It’s crazy what can happen in a year. I met the love of my life and the rest is history. I was having a hard time ending this post, because frankly, I think I could talk about that evening forever. Then I realized that this post doesn’t have an ending, but instead, a beginning. Thank you so much for all of the love, excitement, and gratitude.


read this post
⟶
LIFESTYLE
Dark Chocolate Chip Pumpkin Bread
One of my favorite things to do in the fall is bake my dark chocolate chip pumpkin bread! I’ve made it *so* many times for me, J, and friends & family. It’s moist, decadent, and super easy to make! It also makes for a great DIY housewarming gift.


This is amazing! I didn’t know you could do this. Now I just need Adobe Lightroom!
<3
katsfashionfix.blogspot.com
Thanks for sharing this!
xx
Mademoiselle Coconath
http://mllecoconath.com
Yeah thanks it help so much
Such an important part of blogging!
XO Ellen from Ask Away
http://www.askawayblog.com
This is awesome! Thanks so much!x
This is great to know- thanks so much for sharing!
Kate // This Side of Paradise
Very informative and helpful! Thanks. Great post!