
Take Life One Cup At A Time
take the quiz! It only takes a minute - promise! >
Hey girl! What's Your Signature Latte? Whether it's a frothy latte or a cold brew, your personality shines through. Find out what your java ingredients are!

shop my instagram
LIKEtoKNOW.it


Removing Haze from Photos
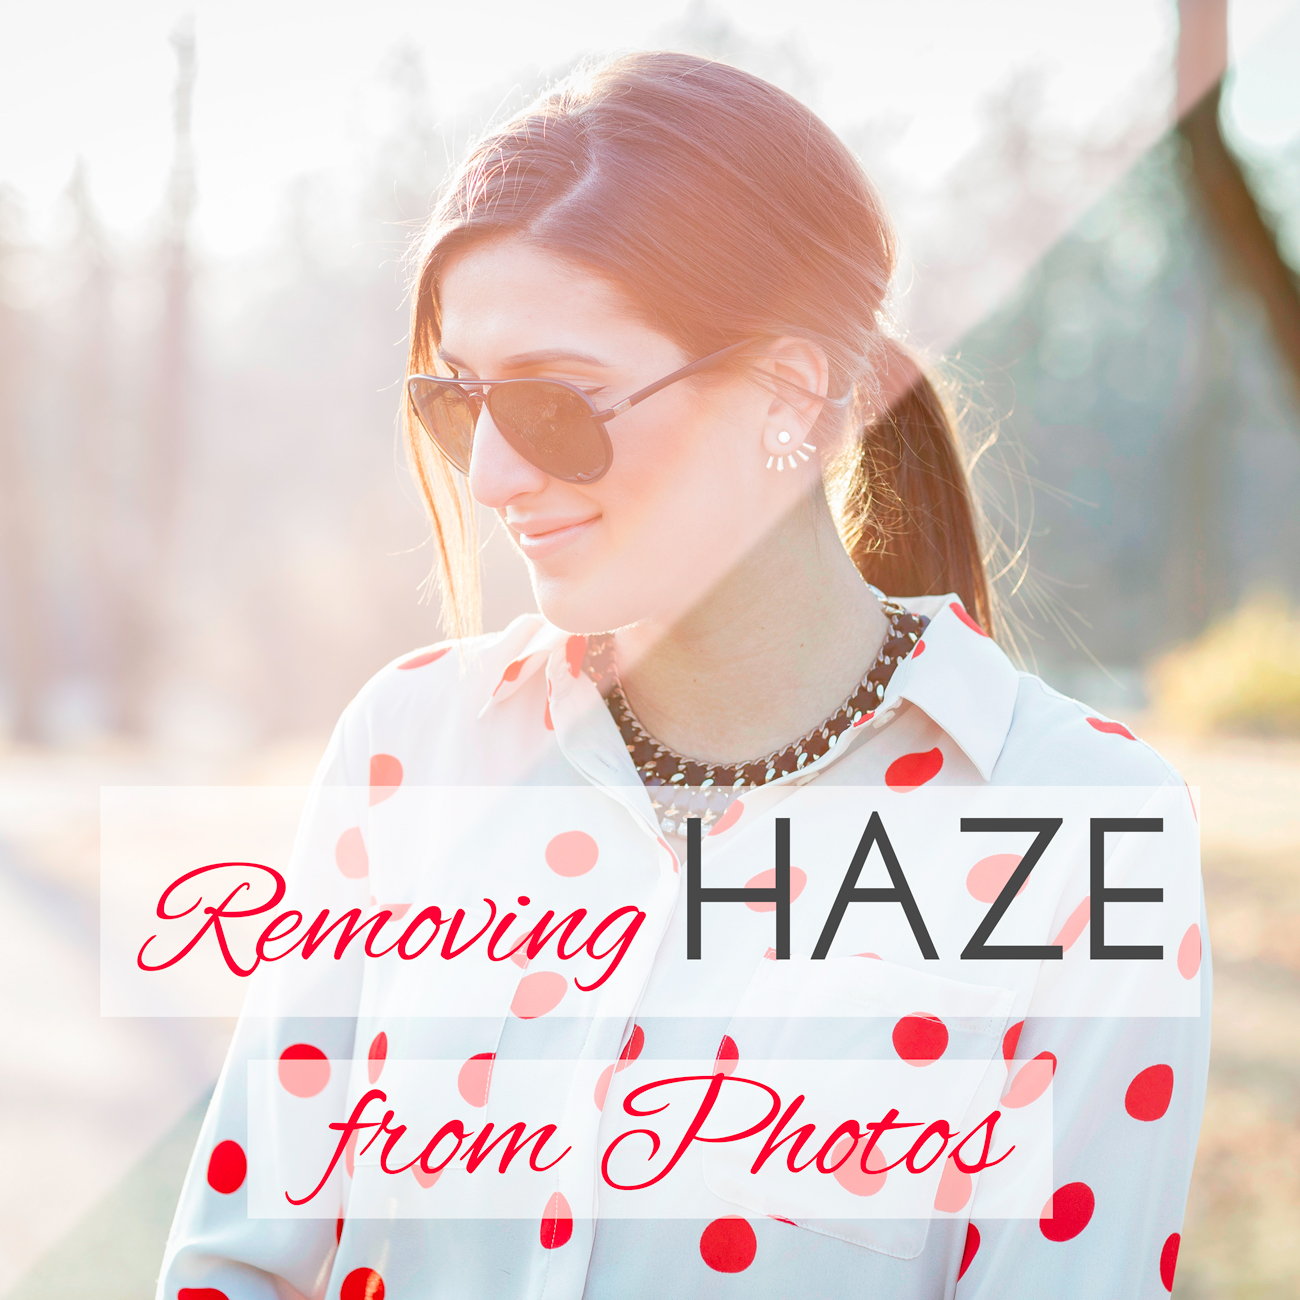
For this week’s Photo Tip Thursday, I’ll be going over how to save images with too much haze caused by shooting into the sun or through windows. Shooting into the sun can make for some beautiful sun flare in images, but sometimes, using large apertures and shooting at certain angles in relation to the sun can result in images that are washed out and lack contrast. See the image below to see what I mean.

As you can see in the image above, the amount of sun flare in the image is entirely overwhelming causing a lot of haziness. Detail is lost in both the highlights, as well as in the shadows in the image. Also, there is a dramatic loss of contrast.
Luckily however, if you’re shooting in RAW format, there is a pretty simple way of removing haze from photos! Today, I’ll be showing you how to do this in both Adobe Lightroom as well as Adobe Photoshop (the workflow will be the exact same for Photoshop Elements).
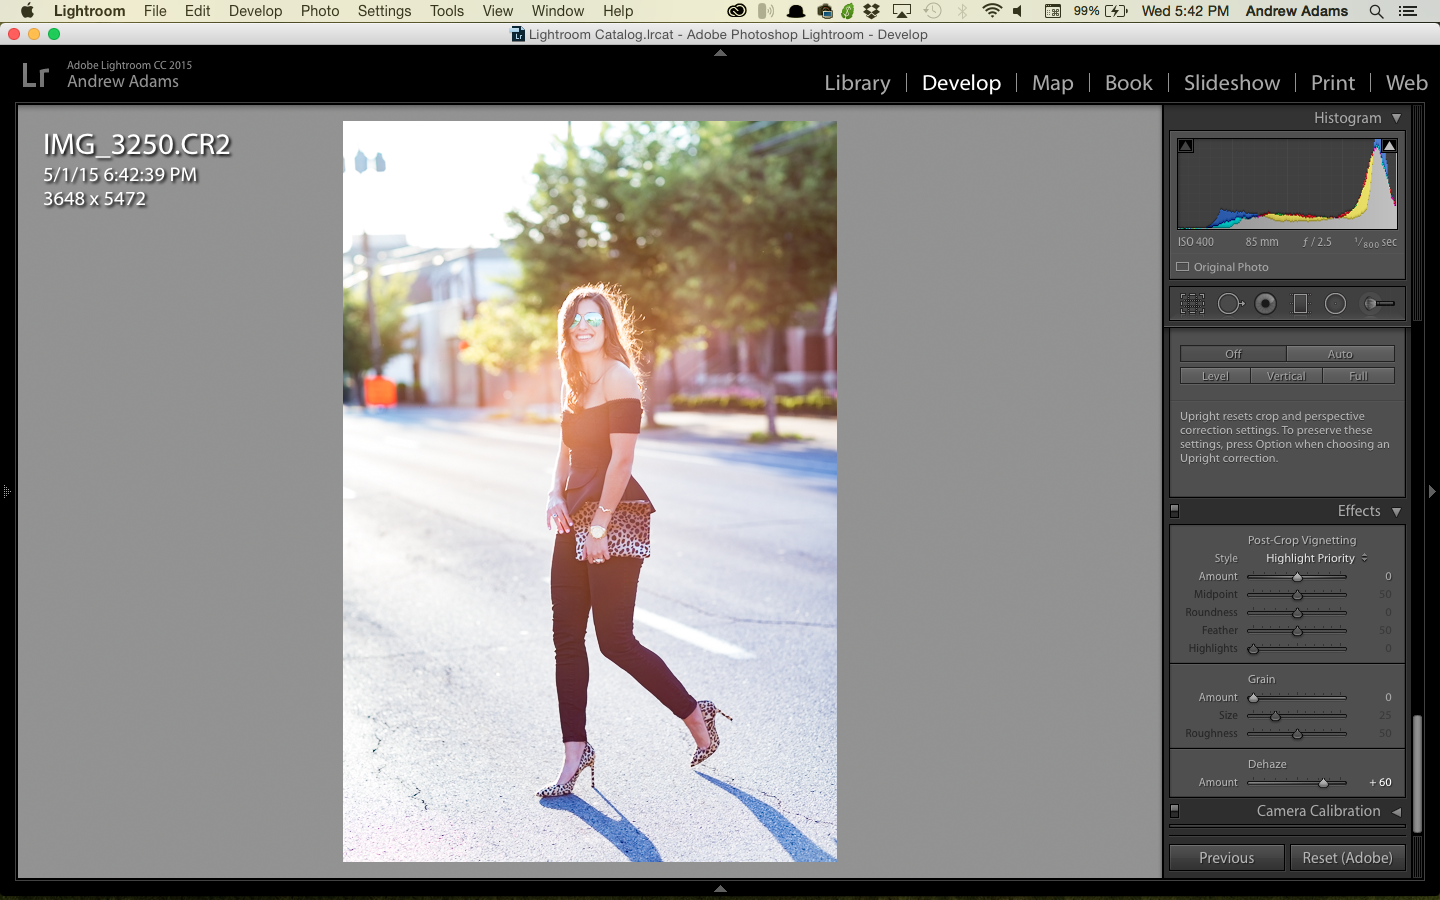
First we’ll begin with Lightroom. Keep in mind that this feature is only available in the latest version of Adobe Lightroom CC 2015. To begin, open the photo in Lightroom. The numerical values I list below with the instructions are the settings I used for this photo, but keep in mind they’ll vary for different images!
1) Use the ‘Dehaze’ slider (+60) located under the ‘Effects’ tab. Move the slider to the right until the haze is reduced to a point that you like, and that seems natural. The photo might begin to look oversaturated but we’ll correct this in the next step. If by chance you don’t have the latest version of Lightroom, you can adjust the Tone Curve to look like the Curve in the first step of the Photoshop instructions.
2) Use the ‘Saturation’ slider (-10) to reduce the overall saturation of the image slightly, then, increase the ‘Vibrance’ slider (+27) to bring back some color into the skin tones of your subject. Both of these sliders are found in the ‘Basic’ tab. Use these sliders as necessary, as amounts will vary with different scenarios.
3) Move the ‘Shadows’ (-30) and ‘Blacks’ (-37) sliders to the left to darken the shadow regions and add some contrast back into the image.
4) Increase the ‘Contrast’ (+19) and ‘Clarity’ (+9) sliders also found in the ‘Basic’ tab EVER SO SLIGHTLY! Don’t go too overboard with these sliders as they can make the image look really wacky.
Next we’ll go over removing haze in Photoshop. This works the same in Photoshop Elements as well! Begin by opening the image in Photoshop. We’ll be using only adjustment layers, which are non-destructive, meaning that you don’t have to do any complicated steps like duplicating the background layer to ensure the original image doesn’t get altered!
1) Add a ‘Curves’ adjustment layer {Layer→New Adjustment Layer→Curves}. With the RGB channel selected, click on the line in the graph to add a point to the curve, then drag it down and to the left. It should look something like this:

Input: 95 Output:41 (these numbers refer to the X,Y position of the point on the graph)
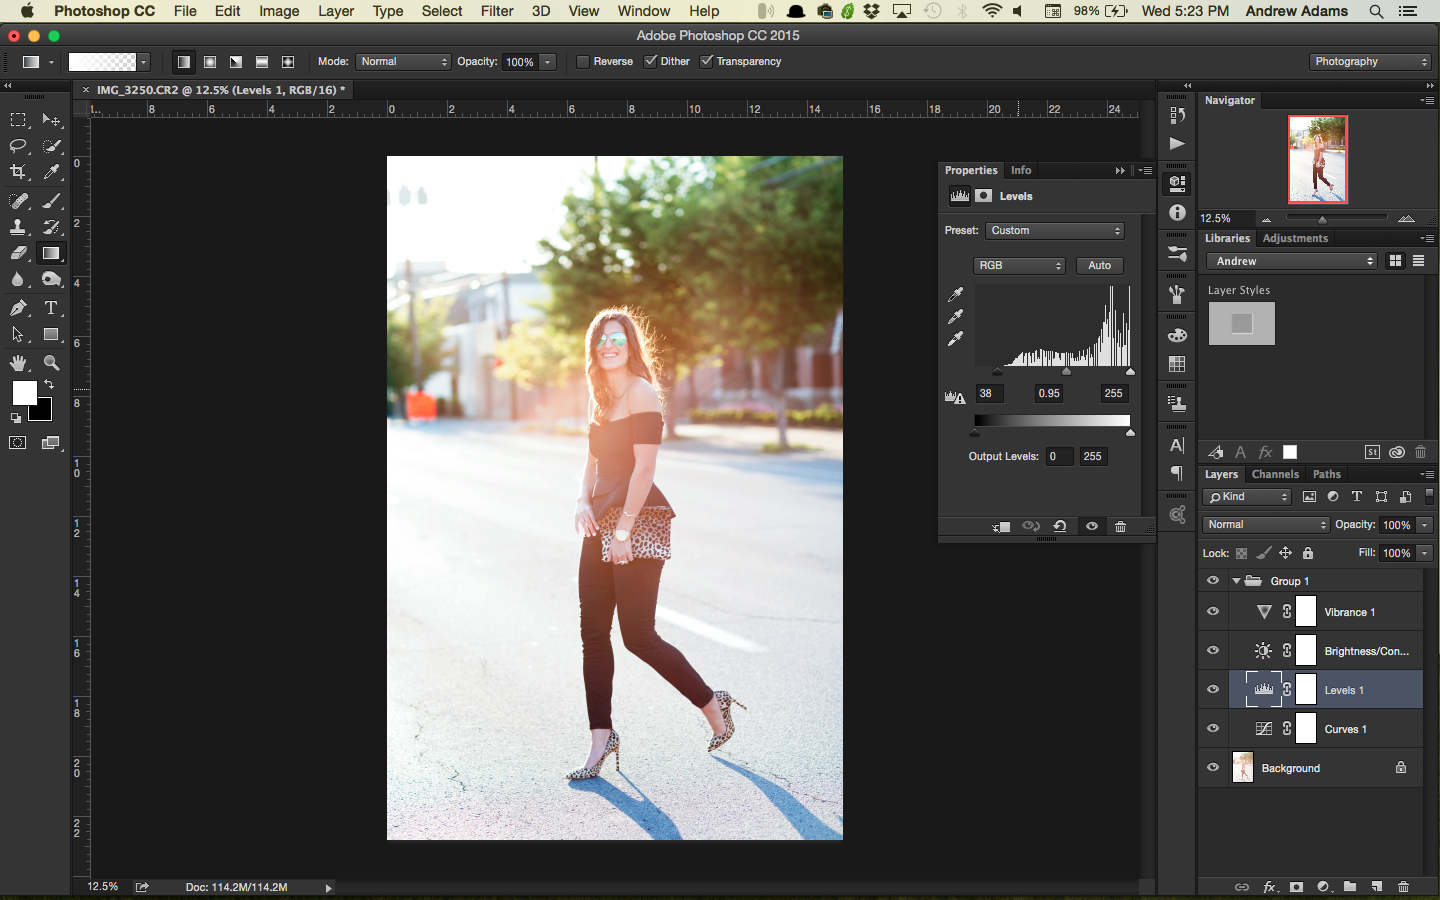
2) Add a ‘Levels’ adjustment layer {Layer→New Adjustment Layer→Levels}. Make sure the RGB channel is selected and then move the ‘Blacks’ slider (black tab) and the ‘Midtones’ slider (grey tab) slightly to the right. There should be three boxes under the graph with these tabs with numbers in them (the values I used in these boxes were Shadows: 38, Midtones: 0.95, Highlights: 255). This will add more depth to the shadows and dark regions of the image.
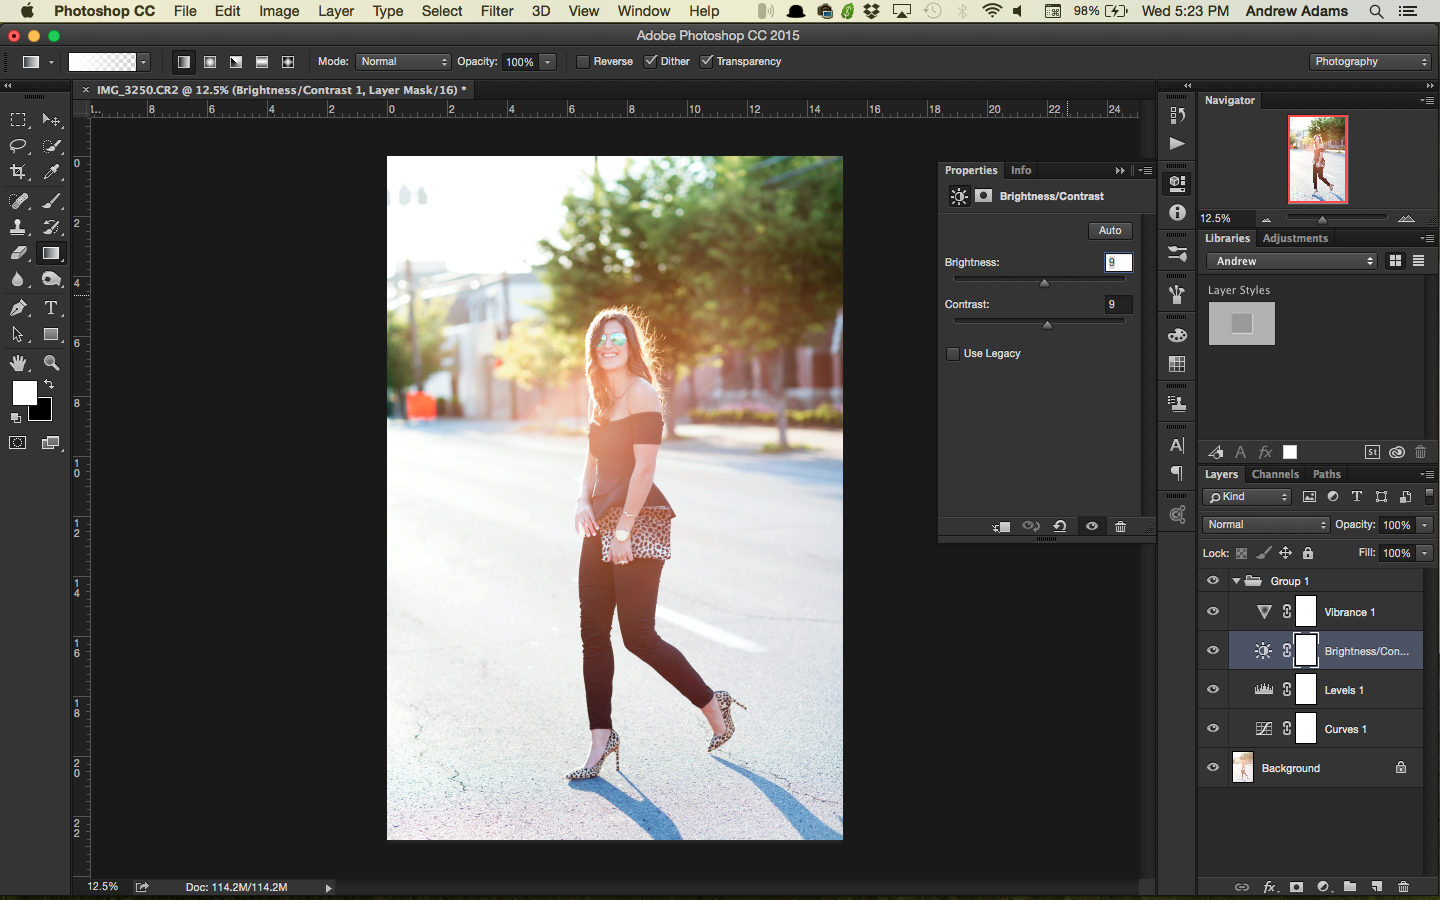
3) Add a ‘Brightness/Contrast’ adjustment layer {Layers→New Adjustment Layer→Brightness/Contrast}. Set the ‘Brightness’ slider to +9 and the ‘Contrast’ to + 9. This will add more contrast and brighten the image slightly.
4) Add a ‘Vibrance’ adjustment layer {Layers→New Adjustment Layer→Vibrance}. Move the ‘Vibrance’ slider to the right (+35) and the ‘Saturation’ slider to the left (-10).

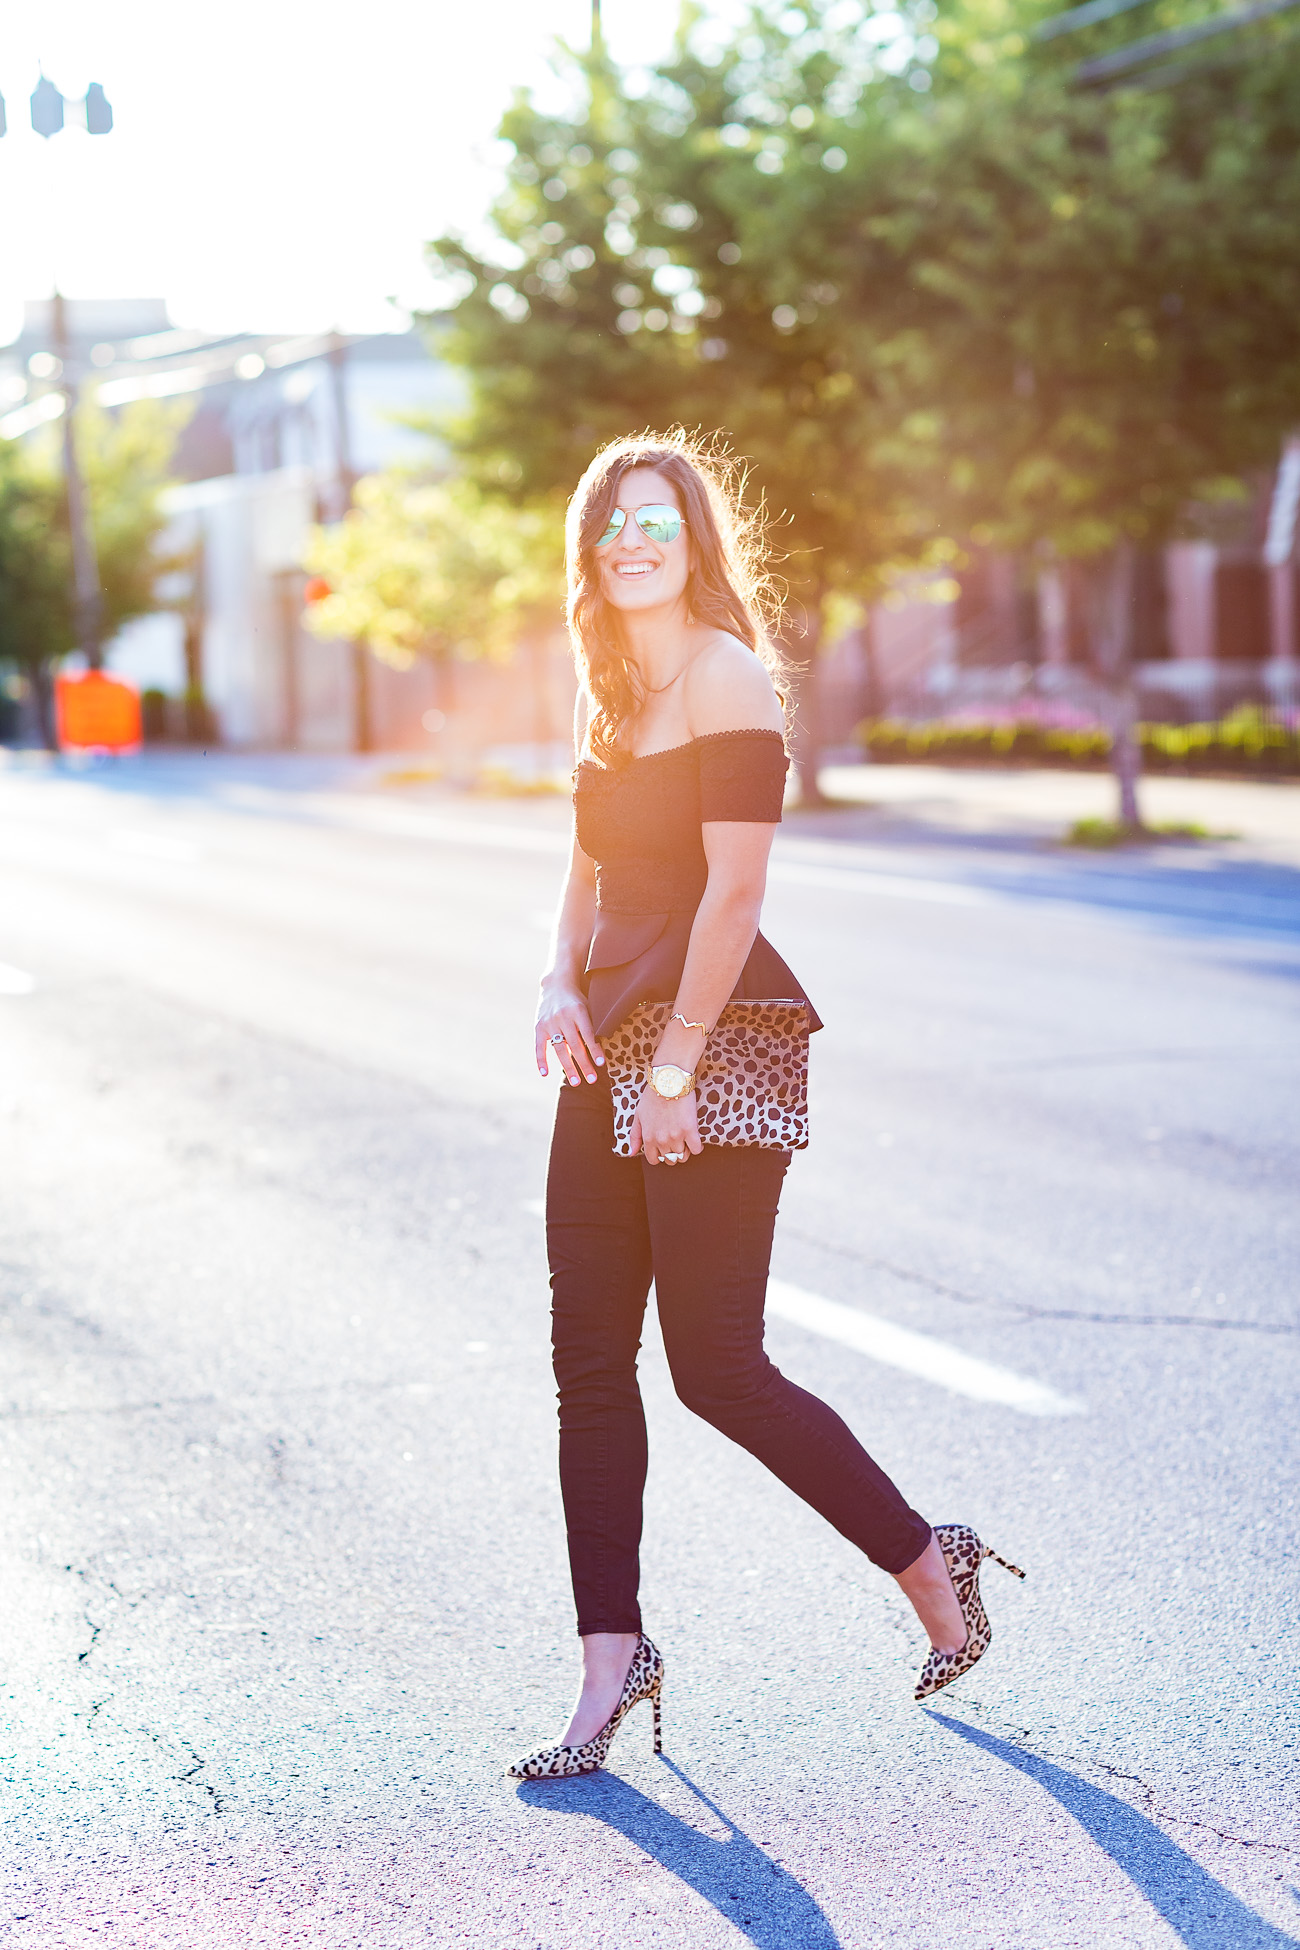
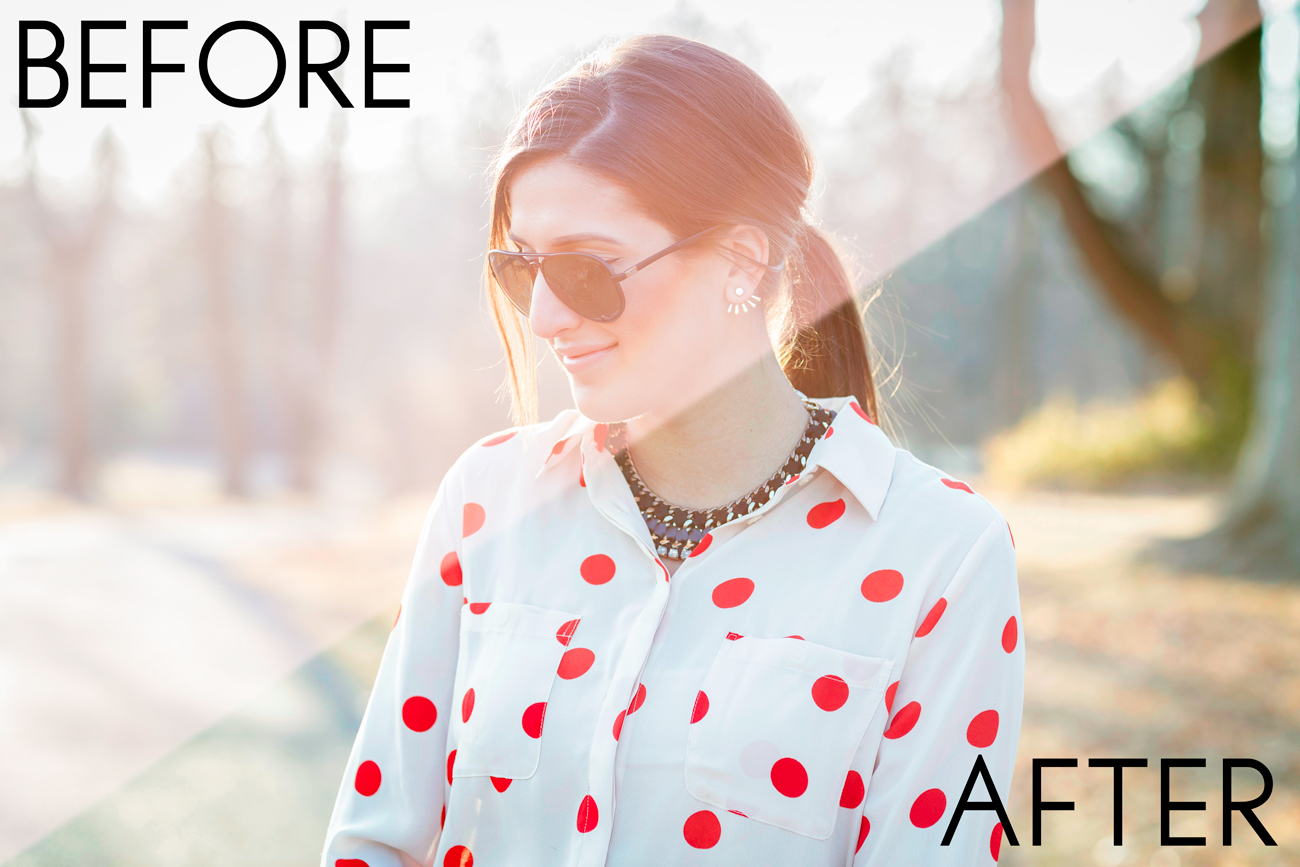
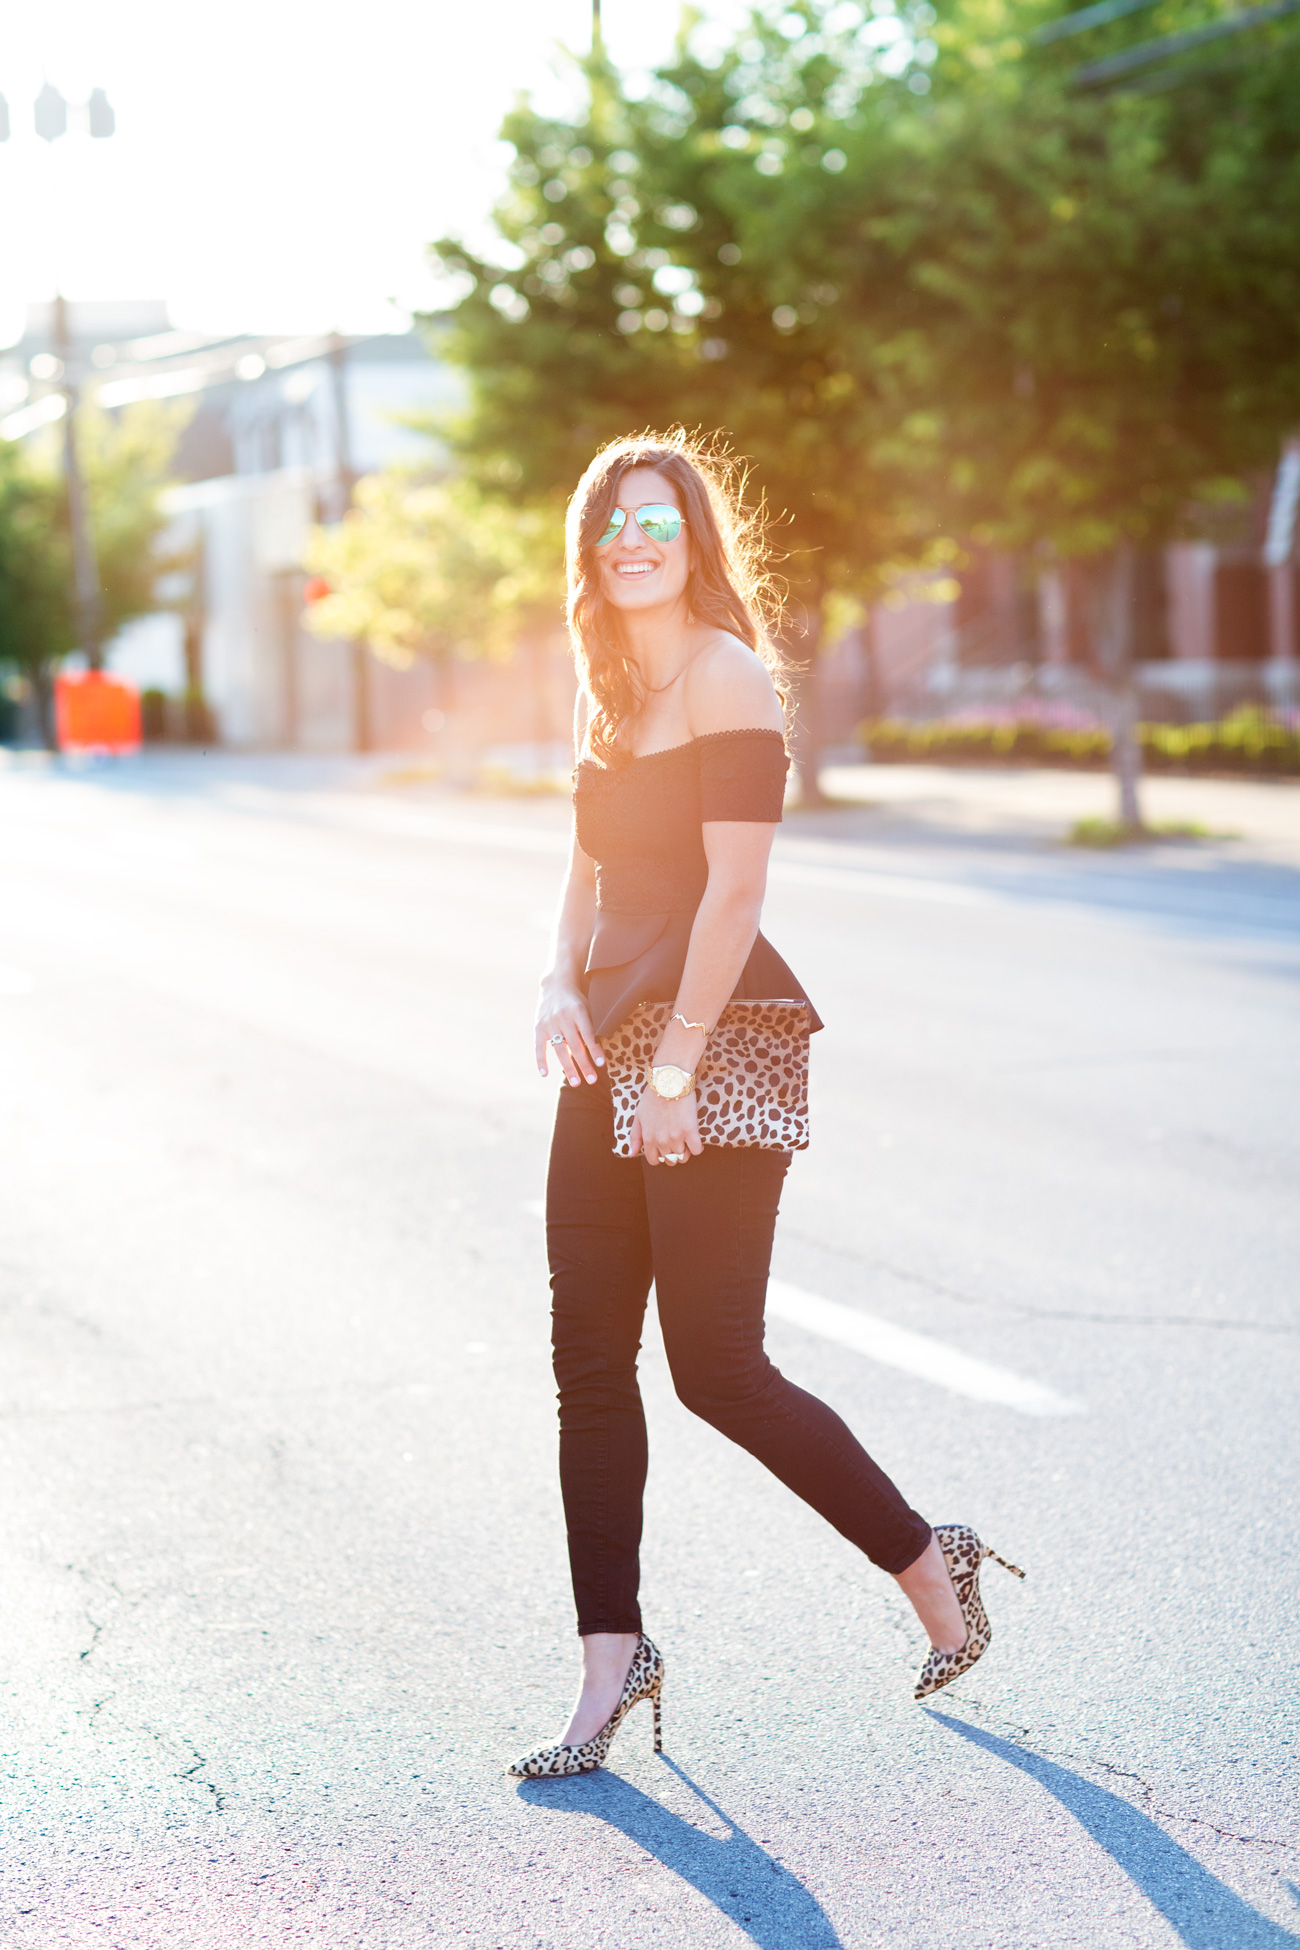
There you have it! Take a look at the before and afters for yourself. Blown out images lack detail and contrast to begin with, but after some basic adjustments, you can get some amazing images from ones that otherwise you might have seen as unsalvageable.
Thanks for reading!
Andrew
Leave a Reply


Become a healthier version of yourself by joining the FITwithASD community today! For only $8.99/month or $89/year, you never have to worry about workouts, macros, or a meal plan again.
learn more about fitwithasd ⟶


shop my instagram
LIKEtoKNOW.it
The All-Time Favorite Posts

read this post
⟶
Personal
10/27/18 Mr. & Mrs. White
There’s not a day that goes by when I don’t feel so blessed to be Jordan’s wife. He is my everything. These photos and video are the sweetest reminder of our love for one another. So, grab a cup of coffee, pull up a seat, and try not to bawl your eyes out (because I know we did). Every time we look through our photos and watch our video, we cry the happiest tears.


read this post
⟶
Personal
The Proposal
It’s crazy what can happen in a year. I met the love of my life and the rest is history. I was having a hard time ending this post, because frankly, I think I could talk about that evening forever. Then I realized that this post doesn’t have an ending, but instead, a beginning. Thank you so much for all of the love, excitement, and gratitude.


read this post
⟶
LIFESTYLE
Dark Chocolate Chip Pumpkin Bread
One of my favorite things to do in the fall is bake my dark chocolate chip pumpkin bread! I’ve made it *so* many times for me, J, and friends & family. It’s moist, decadent, and super easy to make! It also makes for a great DIY housewarming gift.

