
Take Life One Cup At A Time
take the quiz! It only takes a minute - promise! >
Hey girl! What's Your Signature Latte? Whether it's a frothy latte or a cold brew, your personality shines through. Find out what your java ingredients are!

shop my instagram
LIKEtoKNOW.it


Photo Tip Thursday: Shooting Wide Open
This week’s photo tip has all to do with unlocking the use of the maximum aperture that your lens has to offer. I’m sure many of you have gone out and bought yourselves a 50mm lens with a maximum aperture of around f/1.4 or f/1.8, put it on your camera and immediately set the lens to its largest aperture and tried to take outfit photos. After all, the larger the aperture, the blurrier the backgrounds, right? Well…it probably didn’t work out nearly as well as you’d hoped it would {a.k.a. you got a whole lot of blurry photos}, and you probably asked yourself why you even spent all the money on a lens with that large of an aperture if you can’t even use it to take outfit photos. Well, you can.
The reason shooting with really large apertures is so difficult is that it involves a completely different shooting technique than you’re used to. You’re dealing with a depth of field that is razor thin so it leaves absolutely no room for error. If you screw up, your subject will be entirely out of focus. So, here’s several techniques/pieces of advice that you’ll need to learn/use to help you shoot wide open.
1. Select a single focus point. This is the most crucial. When dealing with a depth of field this small, you have to tell your camera where to focus. A camera decides where to focus by finding areas of contrast, and when you allow the camera to use all of the focus points to determine the area of proper focus, who knows what it’ll focus on. Nine times out of ten though, it probably won’t be exactly where you wanted it to be. When taking full body shots of your subject at maximum aperture, select the vertical most focal point and place it over your subject’s eye to focus. If they’re wearing sunglasses, place this focus point directly on their forehead. If you’re trying to photograph an accessory {such as a watch for example}, choose the focus point nearest to or on the accessory.
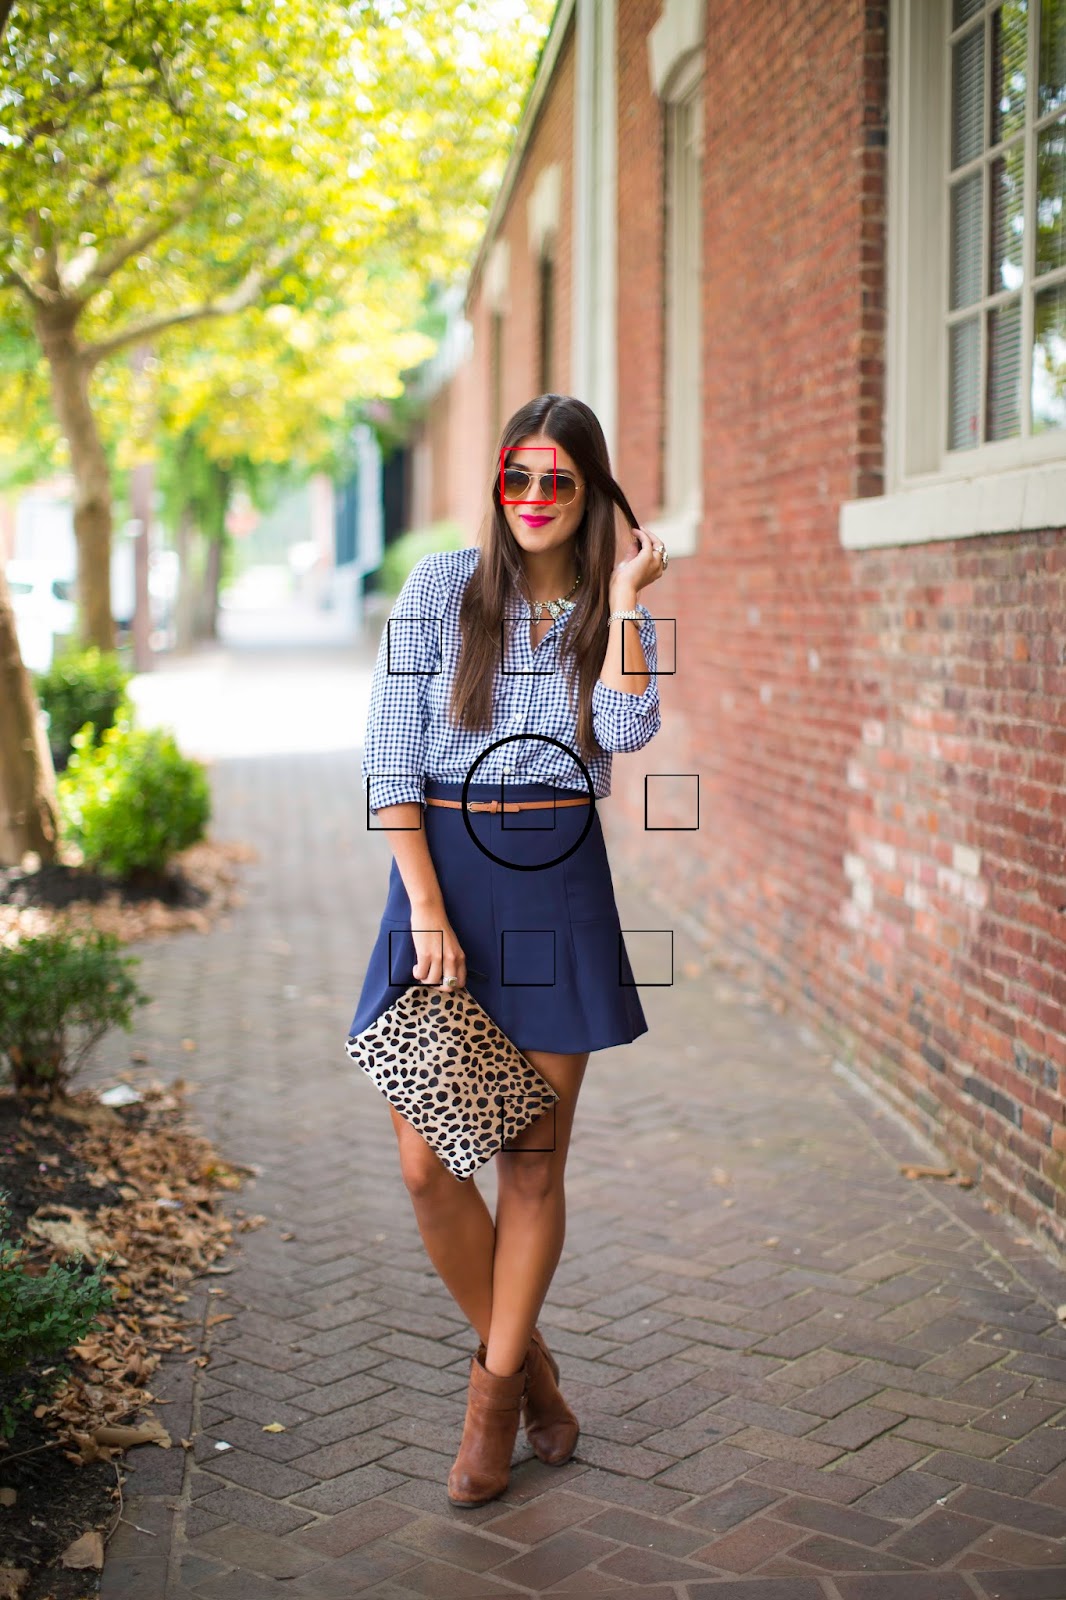 |
| Focus on the eyes or forehead for full body shots. {Taken at f/1.2} |
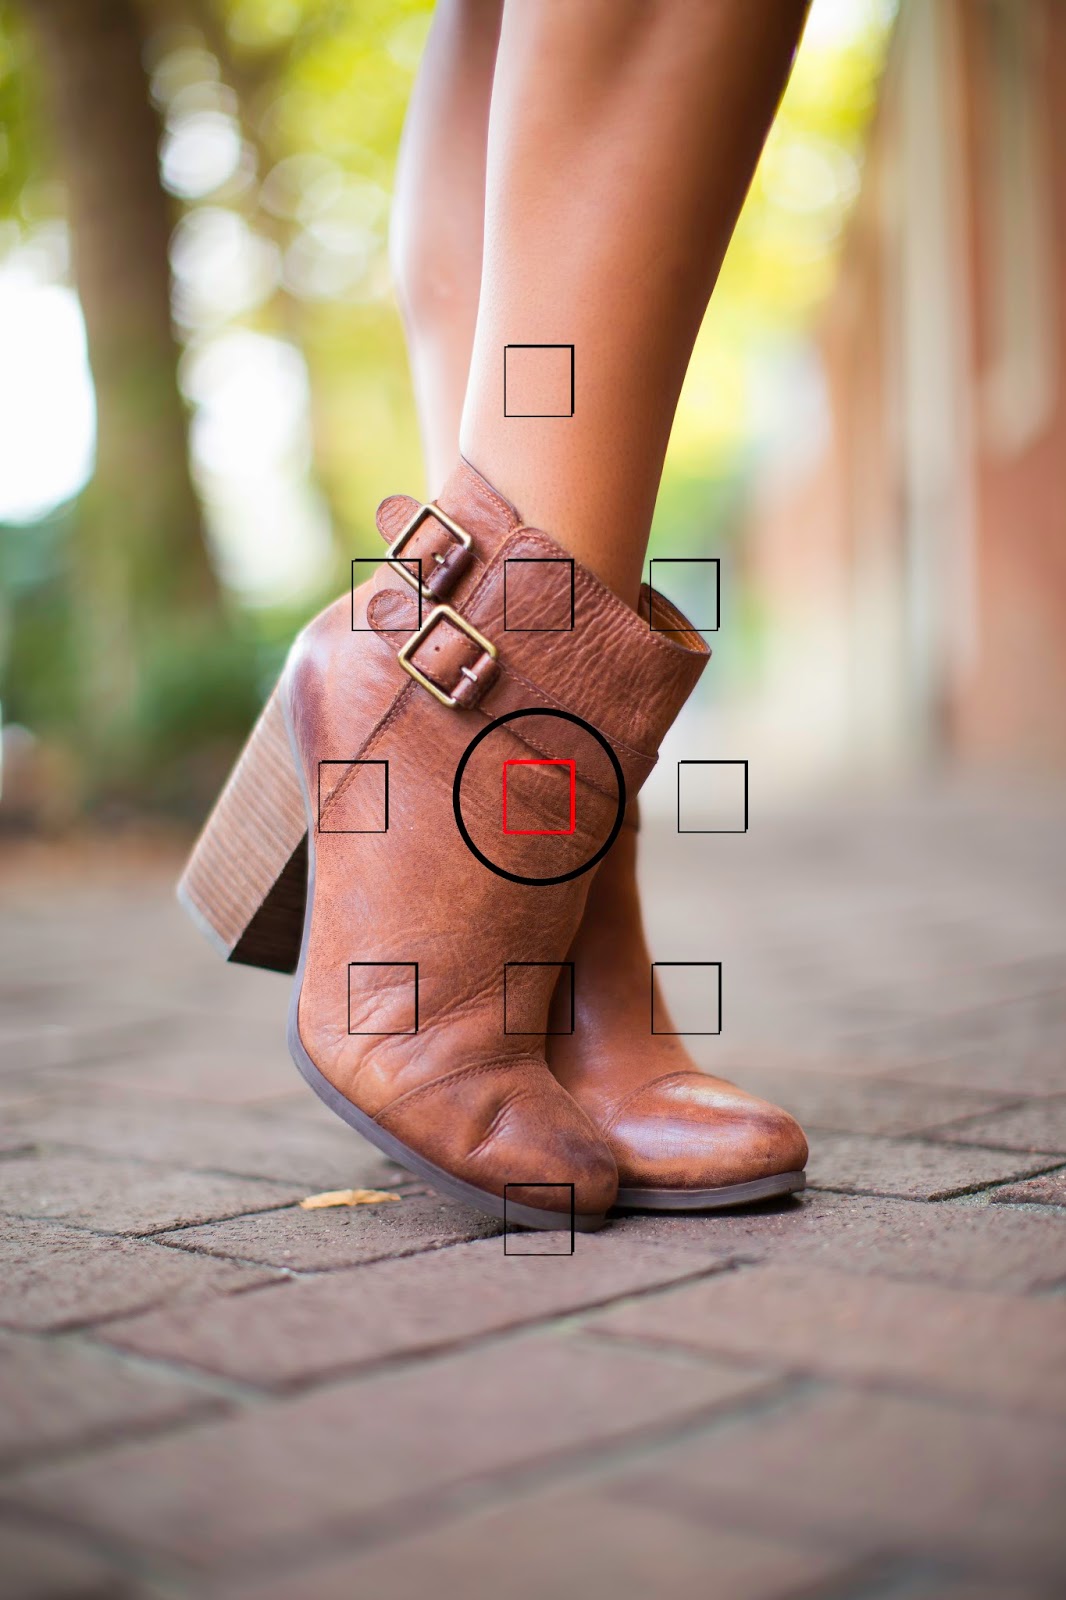 |
| Choose the focus point closest to the accessory that you want to photograph to ensure that it’s in focus. {Taken at f/1.2} |
2. DO NOT focus and recompose! Like I said earlier, the depth of field when dealing with apertures of f/1.2-f/2.0 is very, VERY small. Once you focus, you have to take the picture immediately. If you move the camera even the slightest bit in any direction, or change the angle that it’s facing in relation to the subject, there’s a 99.9% chance that you’re going to get a blurry, out of focus photo. I know many of you want photos where the subject isn’t in the center of the photo, but this just can’t really happen in camera. You can always crop the photo later in post-production to get the composition that you want. Focus on making sure the image is sharp first when taking the picture.
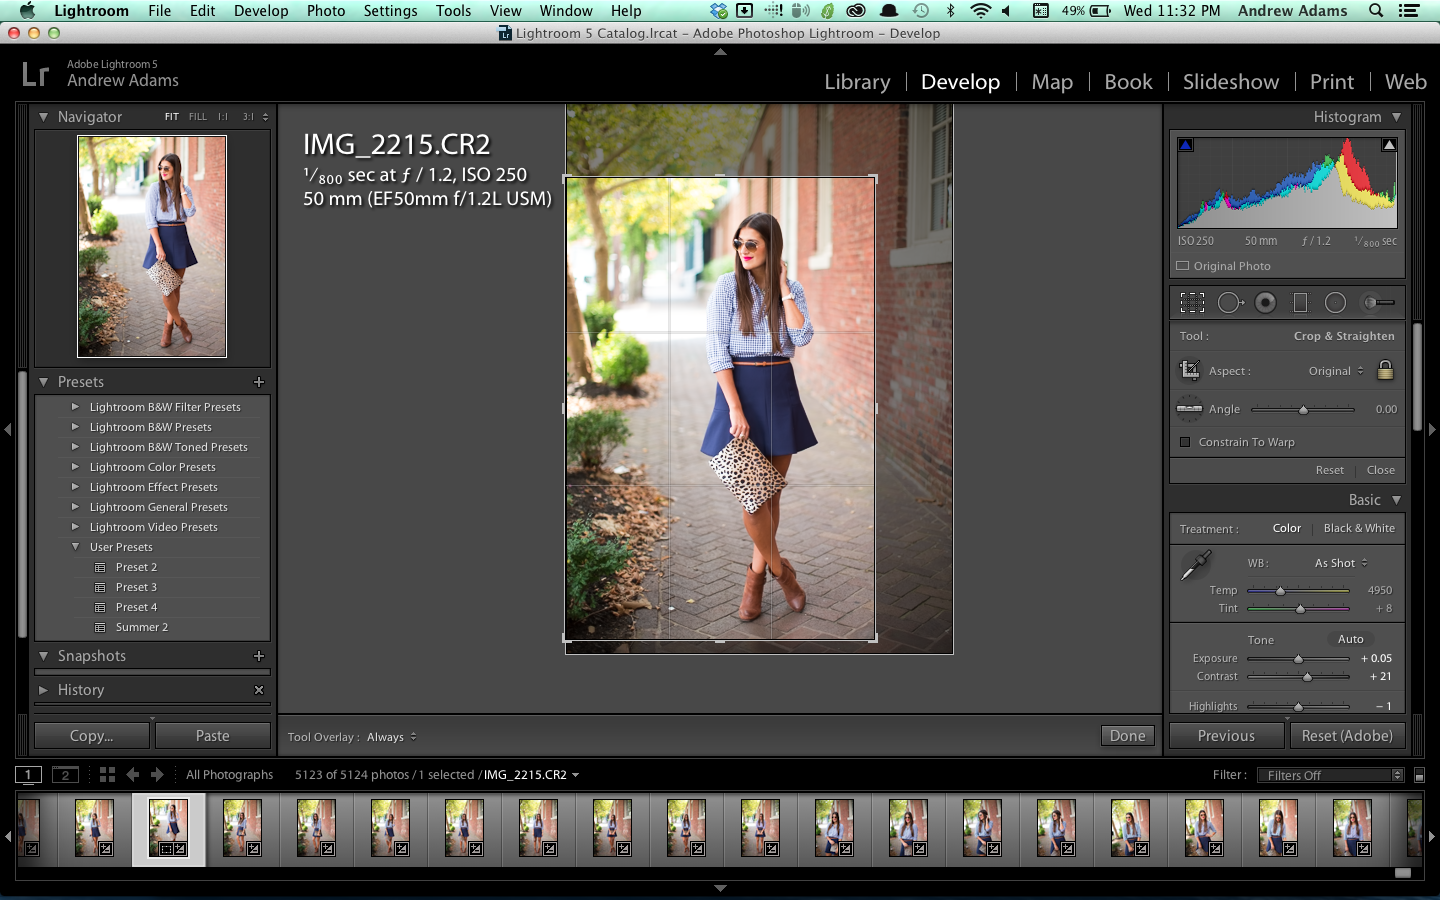 |
| You can change the composition of the subject in post production by cropping the photo should you like. |
3. Maximize your depth of field. This is a neat fact. At a constant aperture, increasing the distance between yourself and your subject will increase the depth of field. All this means is that the depth of field is greater when shooting at f/1.2 while standing 12ft. away from your subject than when shooting at f/1.2 while standing 10ft. away from your subject. If you’re shooting with a large aperture and find that a vast majority of your subject’s body is in focus, but a little bit still isn’t, try taking a few steps back. This might increase the depth of field just enough to get their whole outfit in focus.
Shooting wide open can be devastatingly frustrating to master. I’m not going to sugar coat it either and say that if you become proficient in these techniques that you’ll never get a blurry photo again because that’s just not going to happen. The truth is that you’re going to have to take more photos than you would at a smaller aperture to ensure that you get one that’s really sharp and usable. I still get plenty of blurry photos myself. That just comes with the territory when using apertures with depths of fields this small. But however, by practicing these techniques, you’ll be able to get a whole lot more really great shots that are usable. It might be a little frustrating, but it’s definitely worth it, because let me tell you, when you nail the focus on your subject with a really large aperture, the results are absolutely spectacular.
Leave a Reply


Become a healthier version of yourself by joining the FITwithASD community today! For only $8.99/month or $89/year, you never have to worry about workouts, macros, or a meal plan again.
learn more about fitwithasd ⟶


shop my instagram
LIKEtoKNOW.it
The All-Time Favorite Posts

read this post
⟶
Personal
10/27/18 Mr. & Mrs. White
There’s not a day that goes by when I don’t feel so blessed to be Jordan’s wife. He is my everything. These photos and video are the sweetest reminder of our love for one another. So, grab a cup of coffee, pull up a seat, and try not to bawl your eyes out (because I know we did). Every time we look through our photos and watch our video, we cry the happiest tears.


read this post
⟶
Personal
The Proposal
It’s crazy what can happen in a year. I met the love of my life and the rest is history. I was having a hard time ending this post, because frankly, I think I could talk about that evening forever. Then I realized that this post doesn’t have an ending, but instead, a beginning. Thank you so much for all of the love, excitement, and gratitude.


read this post
⟶
LIFESTYLE
Dark Chocolate Chip Pumpkin Bread
One of my favorite things to do in the fall is bake my dark chocolate chip pumpkin bread! I’ve made it *so* many times for me, J, and friends & family. It’s moist, decadent, and super easy to make! It also makes for a great DIY housewarming gift.


Thanks for sharing this – I am going to be attempting some fashion posts and this is a great starting point!!
I love this series! Thanks for the info!
The Style Storm
<3, Christina
Great tips!! I have yet to purchase my 50mm, and I definitely didn't know about immediately shooting when you focus. Yes, I'm definitely one to shoot my subject within the side thirds. Love these posts!!
I love this post! Thank you so much for sharing these tips. I will go out immediately and try them!
Also this blog is wonderful 🙂
greetings, Sarah
sparklingcrane.wordpress.com
As usual great lesson today!
Great tips for when I'm not usuing a photographer. I do run in to this issue sometimes so I just scrap using it and go with the standard Nikon portrait setting & manipulate from my desk. Your steps seem less time consuming. Thanks.
http://www.stylegonerogue.com
Instagram: koshercoco
Great tips! Thanks!
Liz
http://www.liztheaustinite.com